Are you currently shooting on Automatic
– not taking advantage of the manual settings available in your camera?
Don’t stress it, we’ve all been there it’s how many of us start our photography journey!
I shot on automatic for over a year into my business (before returning to school)! It´s true and I can tell you exactly WHY , I had no idea what the exposure triangle was or how to use it and let’s be real learning to shoot manual can be overwhelming, and it looked too difficult – At that time I didn’t know any other photographers and it all seemed it felt like high school Algebra all over again.
I did create pretty decent pictures in auto and no one was complaining about me not shooting manual. And to be honest I was thinking; “why on earth should I go through the hassle of learning that” I just did not get it – I did not understand WHY this could be a benefit for me.
So let me share with you what I know today, that I did not know back then:
- When you control the manual settings – you get FULL control over your style and images. This is when you can get really creative and this can not be done in auto.
- When you have the control, you save time in Photoshop, because your photo will be close to perfect right out of the camera – you just need to fine-adjust a few things – that´s all.
- By knowing the camera settings you can “dance a beautiful tango” with the available light, instead of being frustrated with it. You can create magic!
It was not until I started to comprehend these benefits, that I became eager to learn to shoot in manual. Once you understand just HOW important light is to making or breaking a photo, you will want to start shooting in manual mode.
How to get started
It might seem difficult and very technical, but it´s actually easier than you think – you just need to put some time aside to practice, take a lot of shots, learn from them and delete them – then do it all over again.
Use the guidelines in this lesson and before you know it you´ll shoot in full manual mode!
Let’s look at some of the manual settings:
Aperture, ISO and Shutter speed are your new friends
To get a good photo you have to know how to let just the right amount of light into the camera. When you shoot in manual mode, you can adjust these functions. Does it sound difficult? I will introduce you to these settings, but remember, the only way to really understand to practice in real life.
(Photographers Note: Setting and adjustments vary between models I strongly advise that you read your manual to know exactly how to use the settings I discuss in this post. Also, if you are a beginner, you should feel no pressure to shoot in manual mode but do try to play with these settings as much as you can.)
Let´s take a look at the control settings on your DSLR camera:
ISO
*Higher ISO settings are generally used in darker situations to get faster shutter speeds
*Lower ISO setting the less sensitive your camera is to light and the finer the grain.
Just like your own eyes, the camera sensor can see with different amounts of light. Unlike your eyes, someone has to tell it how sensitive it needs to be in the varying conditions. Like the volume knob on your television, this sensor has a “volume” control that adjusts how much light it records. The higher the sensitivity, the less light you need to make a picture. Typically, ISO 100 is the least sensitive setting and is used when the lighting conditions are optimal.
Note that higher ISO settings can make the final image look worse by adding “noise” that appears as ugly dots in the final image. More expensive cameras typically can operate at higher sensitivity levels without nearly as much noise. This is one reason that some digital cameras cost plenty of $$$ while others only cost less. The more expensive ones can shoot good pictures with much less light (like Canon 7D, Canon 5D and Nikon 700, which are excellent at this, but cameras like 550D and 600D do great too with high ISO).
So how do you use this info?
First, remember to aim for the lowest ISO setting possible. Low ISO gives you sharp crisp images with less noise. Sometimes, depending on your environment, you’ll really need to push ISO up to get a properly exposed image. When your lighting conditions are good go for ISO 100-200. For the most part this works fine when shooting outside in broad daylight. When shooting inside, where there is less light, you might have to go for a higher ISO – sometimes higher than 400 or above.
This is a great tool to use when you shoot in low light situations ( a wedding inside a dark church) and you don´t want to use flash.
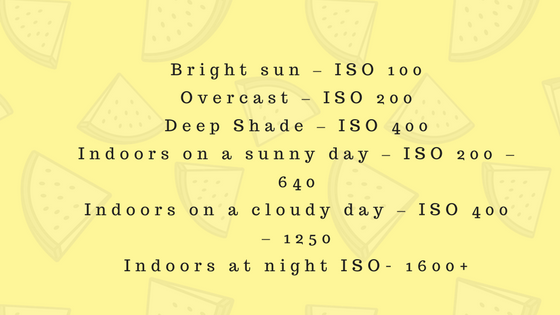
Here are a few loose guidelines for ISO settings:
*** If you live in a place where the weather often is gray and rainy without much sunshine – like I do, don´t be afraid to shoot with a higher ISO. Unless the sun is out, my ISO is often set between 300 and 600. This does not affect the quality of my images very much. And a little noise in your picture can be reduced in photoshop.
This setting is not full manual mode and it´s not full auto mode either. This is a mix between the two, we call it half manual. Now YOU control the ISO setting in your camera, but the camera controls the rest. Your camera will adjust shutter speed and aperture for you and make sure it works together with your chosen ISO setting.
Now try and take a few shots with ISO 100, ISO 400, ISO 800 and the highest ISO your camera will go to – mine (Canon 7D) will go all the way up to 6400! Play with it and see the difference. Notice that the higher you go the more light your camera will let in. Also, notice if your image starts to get grainy and you see noise when you push it high up.
NB: Don´t aim to shoot in P mode – this is just to get to know the function, so you can use it in full manual later.
Shutter speed
* The slower the shutter speed, the more light will enter the camera.
* The faster the shutter speed, the less light will enter the camera.
You can also control how long the camera’s opening stays open. The opening in your camera lens is covered by a “shutter”. When you click the button on your camera to take a picture, the shutter opens for a brief moment. The longer it stays open, the more light comes into the camera.
Shutter speed is used for capturing movement. In most cases, you want the shutter speed to be fast enough to capture your image without any blurriness. As a portrait photographer, this can be a playful tool, a way to make creative portraits where you “freeze” a moving moment. This is great when you photograph kids, dance, sport and anything else with movement.
If you look at your camera’s dial button, shutter priority mode is called Tv or S depending on your camera model. When you set your camera to shoot in this mode, you control the shutter speed manually, but ask the camera to take care of the rest of the settings (ISO and Aperture). Only when you shoot in full manual, will you have to decide how to adjust all of these controls, but we´ll get to that later.
I don’t shoot anything slower than 1/80 handheld. In portrait sessions where my subject is NOT moving my shutter speed is set between 1/80 and 1/160 depending on the situation. If I want to shoot lower than that I´ll use a tripod to get tack sharp images.
(Note: When I returned to school my Professor taught us this tip: Always shoot at a shutter speed higher than the length of your lens. If you are shooting with a 50 mm lens, go with 1/50 and above. If you’re shooting with a 100 mm lens, go 1/100 and above.)
When your shutter speed is not right, camera shake can occur, especially when you are holding your camera in your hand (not on a tripod or other stable surface). Your hands are naturally shaky and cause your photo to be blurry.
 Now, check your camera for “Tv” or “S” on the dial button.
Try to play with this to test different shutter speeds. Take your camera to your kitchen and let the water run for a while, point your camera at the running water and photograph it at different shutter speeds – see the effect. Or you can ask your kids to jump like crazy..(smile) and practice the settings. Notice that when you shoot in TV mode, the camera will control f/stops for you (aperture) but you can and should control the ISO here too. Remember the higher shutter speed you choose the less light the camera will let in = dark pictures, so push up the ISO if you need to.
Notice that when you shoot in TV mode, the camera will control f/stops for you (aperture) but you can and should control the ISO here too. Remember the higher shutter speed you choose the less light the camera will let in = dark pictures, so push up the ISO if you need to.
Play, and practice – have fun!
Aperture Mode
* The wider the aperture opening, the more light will enter the camera.
* The smaller the aperture opening, the less light will enter the camera.
The third way to control light coming into your camera is to change the opening size of the camera’s sensor. This hole, called the aperture, is the place where light enters the camera. Obviously bigger hole lets in more light than a smaller hole.
The scale used to measure the aperture size is the “f-number” scale. This sounds much more complicated than it is. There is one trick to understanding it: A smaller f-stop number indicates a bigger aperture opening.
F-stops are indicated by these fractions (see why math is important!) on your camera: f/1.4, f/2, f/2.8, f/4, f/5.6, f/8, f/11, f/16 etc.
When shooting at a lower f/stop (ie: larger aperture: f/1.2 – f/2.8), the ‘in focus’ part of your image will be smaller and the background will be blurry – this is great for portraits, flowers and still life. Small apertures (ie: f/8 and above) cause more of the background to be in focus this is great for shooting families, interior, buildings or street life.
The lower the f-stop on your lens, the easier you can achieve a blurred background. That’s why lenses with low f-numbers are preferred for portraits. Portraits look good with blurry backgrounds. That blurred background effect is called “bokeh“. I have a tendency to create bokeh/blur in many of my pictures – again this is a matter of taste and style.
Please note that if you have a standard kit lens like the 18-55mm will only be able to go as low as f/3,5.
 Look for “Av” or “A” mode for aperture control.
This is the only setting I use when I´m not shooting in full manual mode. Aperture mode and it just wonderful for portraits, still life and boudoir – which I shoot most the time. I often want to go as low as possible f/1.2 – f/2.8 is where mine is set most of the time.
When shooting in A mode the camera controls your shutter speed – you can still control the ISO or choose to put this on automatic as well.
Now try to focus on a subject near you, perhaps your Coffee cup or a vase with flowers. Focus on the subject while constantly changing the f-stop settings – Notice what happens. Pay attention to the difference in each picture.
If you’re not ready for shooting in full manual mode yet – this should be your preferred mode to shoot in
When you feel you understand these settings it´s time to move into FULL manual mode!
Full manual mode
If I have an outdoor family session the odds are higher that we will be shooting in daylight which puts my camera sensor in the position to have a lot more light on it, I need reduce that amount to a minimum. I can do any of the following: I can lower my ISO to 100, raise my f-stop and raise my shutter speed.
But on a gray cloudy day, when I shoot inside with not much great available light I need to raise my ISO, lower my f-stop and my shutter speed. This way I can let more light into the camera and still get a decent photo without using flash.
Of course, every situation is unique especially when you shoot with natural light, so the above examples are just rough guidelines.
Practice a ton and have fun!!


